Apply themes to Accordion Panel V3 - tutorial
home » flash components » user interface » accordion panel v3 » apply themes to accordion panel v3 - tutorial »
1. Open your Adobe Flash CS3 software and create a new file (File/New/Flash Document). Drag an accordion panel on the stage from the Component palette.
2. If you can't find the accordion panel component, please see the How to install a MXP file tutorial. If you have trouble configuring your accordion panel please see the How to find Help for Jumpeye components.
3. Before you continue with this tutorial please read the Create a Simple Accordion Panel tutorial.
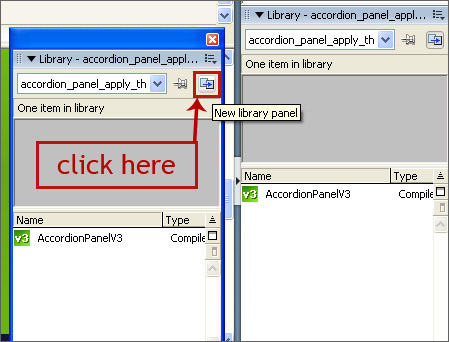
4. Open the SkinAssets.fla file from the Demo folder that came with the Accordion Panel. Move back to your accordion panel file that you created and click the little button on the upper right corner of your library for adding a new library panel.

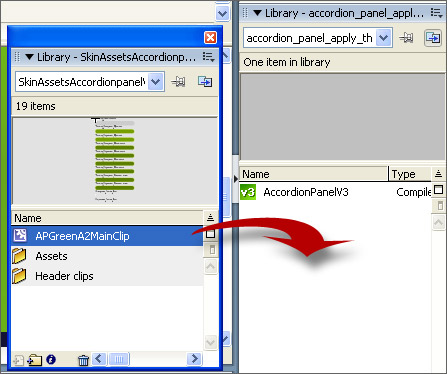
5. Click the dropdown button from one of the library panels and chose the SkinAssetsAccordionpanelV3 file. From this library drag the APGreenA2MainClip movie clip to your accordion panel file.

6. Now you don't need anymore the SkinAssetsAccordionpanelV3 library panel. You need to define your new styles in the xml file like this (or you can simply use the edited xml file:
  <styles>

       <style1>

            <folderCollapsedIconId>AP_GreenA2_style1_folder_collapsed

            </folderCollapsedIconId>

            <folderExpandedIconId>AP_GreenA2_style1_folder_expanded

            </folderExpandedIconId>

            <iconPaddingLeft>5</iconPaddingLeft>

            <spacing>10</spacing>

            <headerSize>20</headerSize>

            <textFormat>

                 <font>Tahoma</font>

                 <size>11</size>

                 <color>0xFFFFFF</color>

            </textFormat>


            <states>

                 <up>

                      <mcLinkageId>AP_GreenA2_style1_false_up</mcLinkageId>

                 </up>

                 <over>

                      <mcLinkageId>AP_GreenA2_style1_false_over</mcLinkageId>

                 </over>

                 <down>

                      <mcLinkageId>AP_GreenA2_style1_false_down</mcLinkageId>

                 </down>

                 <selected>

                      <mcLinkageId>AP_GreenA2_style1_false_selected</mcLinkageId>

                 </selected>

                 <expanded_up>

                      <mcLinkageId>AP_GreenA2_style1_true_up</mcLinkageId>

                 </expanded_up>

                 <expanded_over>

                      <mcLinkageId>AP_GreenA2_style1_true_over</mcLinkageId>

                 </expanded_over>

                 <expanded_down>

                      <mcLinkageId>AP_GreenA2_style1_true_down</mcLinkageId>

                 </expanded_down>

                 <expanded_selected>

                      <mcLinkageId>AP_GreenA2_style1_true_selected</mcLinkageId>

                 </expanded_selected>

                 <disabled>

                      <mcLinkageId>AP_GreenA2_style1_false_disabled</mcLinkageId>

                 </disabled>

            </states>

       </style1>

  </styles>
In order to read about every style tag, please read the style help page.
7. After you defined you styles, you have to call them up in the data node like this :
  <data childStyle="style1">

       <item title="Chocolate"  contentPath="images/img1.jpg"/>

          …………….        …………….        …………….        …………….

  </data>
8. Save your xml file and hit Ctrl + Enter to test your movie. This is how your swf should look like :


