Xml Slide Show V3 tutorial
1. Install the XMLSlideShowV3.mxp file. If your Macromedia Flash opened, please close it first and then double click on the mxp file. Follow the installing instructions and then open Macromedia Flash.
2. You can use the pictures provided together with the tutorial's source files.
Download the source files for this tutorial
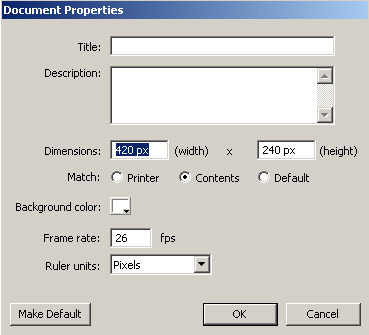
3. Create a new Flash document File>New Document and Set your Flash document to 420px width and 240px height and 26 fps frame rate as in the image below.
Click OK and save the file in the same directory with the folder that contains the images, (Ive placed all images inside a directory called images because I didnt want to mix the fla and swf file with the images).
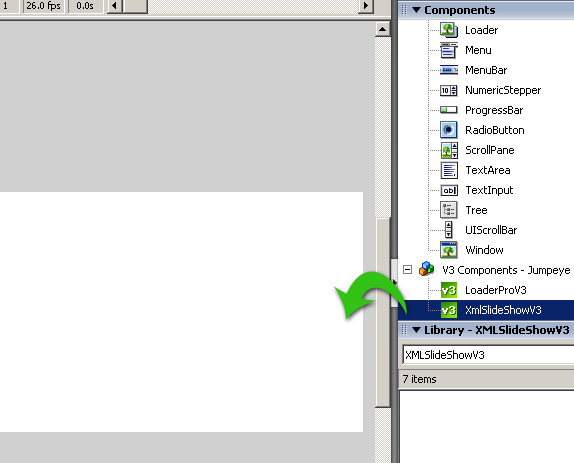
4. Open the Components window by choosing Window>Components (Ctrl+F7 on Windows; Command+F7on Mac) and drag the component on stage.
5. With the component selected, set the size and position of the XmlSlideShow component as below.
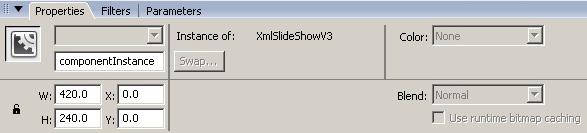
Dont forget to insert the instance name (componentInstance), it will help us when we will add the controls for the Xml Slideshow component.
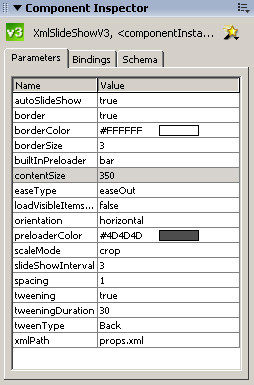
6. Open the Component Inspector window (the component must be selected if is not selected, click on the component again then open the Component Inspector) by pressing Alt+F7 (Option+F7 on Mac) or choose in the Flashs menu Window>Component Inspector and set up the component as in the image you have below.
7. Now we have to set up the xml file. You can download the xml file Ive used. If you need to make some changes Ill explain you how to do it.
Below its just an item
  <?xml version='1.0' encoding='UTF-8'?>


  <component name='XMLSlideShowV3'>


      <data>


          <item itemEvents='true' content='images/jmp10.jpg' />


          …..


          …..


          …..


          …..


          <!—you  have to place all your items here-->


      </data>


  </component>
itemEvents true or false. If true you can use listeners on the item
contenPath the path to the image, swf or movieclip (in my example the images are in the images folder to load external image files. If you want to load movieclips you have in your Library you must enter here the Linkage Id of the movie you want to load)
In order to see the entire list of parameters that can be used in the xml file, please see the documentation page.
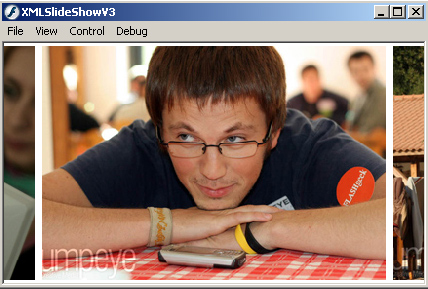
8. If you test your movie (Ctrl+Enter on Windows; Command+Enter on Mac) you should have a looping slideshow, like below
9. We can start to add the controls. Below are my controls, every button is a separate movieclip.
Ive placed all controls on a different layer than the one with the component.
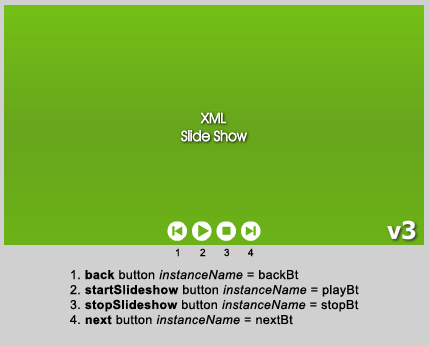
10. Now that you have all instance name set you have to add the actionscript for navigation buttons.
Below is my Layer structure:
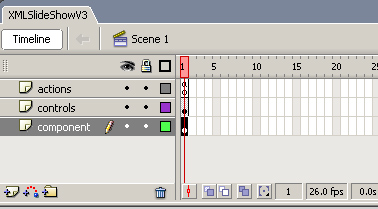
As you can see Ive added an extra layer for my actions and Ive placed the actionscript on the first frame.
Open the Actions panel (press F9 key) and paste the actionscript below:
  backBt.onRelease = function():Void {


       componentInstance.previousImage();


  }


  playBt.onRelease = function():Void {


       componentInstance.startSlideShow();


  }


  stopBt.onRelease = function():Void {


       componentInstance.stopSlideShow();


  }


  nextBt.onRelease = function():Void {


       componentInstance.nextImage();


  }
*Note: You must have set the instance name of the XMLSlideShow to componentInstance. If you didnt set it on step 5, do it now.
11. Ctrl+Enter (Command+Enter) to test the movie. You should have something like below.
Download the source files for this tutorial